Posted on

How to Use JPRO Software to Perform Output Component Test for Bendix?

How to Use JPRO Software to Perform Output Component Test for Bendix

Here is the guide on how to use JPRO diagnostic software to do output component test for Bendix AutoVue 3G LDW system and Bendix SafeDirect Web Portal Processor (3G and 5G).


Related Contents:

JPRO Noregon Diagnostics 2025

Noregon JPRO DLA+ 2.0 Adapter


This test checks for proper functionality of connected alert systems, including: Speaker Feedback, Haptic Feedback, and Stereo Mute.

1 Select the Output Component Test and press Enter or the Start button.

2 The test dialog will be displayed.

How to Use JPRO Software to Perform Output Component Test for Bendix


3 Ensure the stereo is muted, then click the desired left or right test button. The selected speaker or haptic motor will be activated until the selected button is clicked again to stop the test.

4 To perform the Stereo Mute test, ensure the stereo is turned on before clicking the button to begin the test.

Select the button again to stop the test.

5 When done, press the Exit button to return to the test selection dialog

Posted on

JPRO 2025V3 Diagnostic Software Bendix Lamp Component Test

JPRO 2025V3 Diagnostic Software Bendix Lamp Component Test

The Lamp Component Test tests proper functionality of the Lane Departure Warning Enable/Disable lamp and the Status Lamp.This instruction show you guide on how to use JPRO diagnostic software to perform Bendix lamp component test.


Related Contents:

JPRO Noregon Diagnostics 2025

Noregon JPRO DLA+ 2.0 Adapter


The Lamp Component Tests are available on:

✓ Bendix AutoVue® 3G LDW System

✓ Bendix SafetyDirect® Web Portal Processor (5G)


1 Select the Lamp Component Test and press Enter or the Start button.

2 The test dialog will be displayed.

JPRO 2025V3 Diagnostic Software Bendix Lamp Component Test


3 Select the desired lamp test button. The selected lamp will be commanded On for 5 seconds and then Off for 5 seconds. Observe the lamps to see if their status changes to match the commanded status displayed on the test screen.

4 When done, press the Exit button to return to the test selection dialog.

Posted on

Mack and Volvo EPA 13 to GHG17 Engines SCR Regeneration by JPRO

Mack and Volvo EPA 13 to GHG17 enginesSCR Regeneration by JPRO

The SCR Regeneration test should be performed to remove DEF crystals that cannot be removed by normal engine operation.Here is the instruction show you guide on how to use JPRO Diagnostic with DLA+ 2.0 to do SCR regeneration for Mack and Volvo EPA12 to GHG17 engine.


Related Contents:

JPRO Noregon Diagnostics 2025

Noregon JPRO DLA+ 2.0 Adapter


This is like the DPF Regeneration except that the temperatures are higher, and the operation may take approximately 30 – 90 minutes to complete.

1 Select SCR Regeneration and press Enter or press Start Button.

2 If not previously shown, the Aftertreatment Instructions are automatically displayed to provide aid in diagnosing issues with aftertreatment systems. When read, select the Close button on the window.

3 The SCR Regeneration dialog displays.

Mack and Volvo EPA 13 to GHG17 enginesSCR Regeneration by JPRO

4 Select the Regen Status tab to see the details for the Inhibit and DPF status.

5 Select the Start button to begin the SCR Regeneration process.

6 Select the Graph & Data tab see data items related to the test. Values for selected data items will be graphed as the test progresses. Click the checkbox next to any data item to add or remove it from the graph.

7 Select the Stop button at any time to stop the test early.

8 Once the test completes, press the Exit button to return to the test selection dialog.

Posted on

How to Use JPRO Diagnostic for Detroit Parked SCR Efficiency Test

How to Use JPRO Diagnostic for Detroit Parked SCR Efficiency Test (1)

The Parked SCR Efficiency Test is supported on:

✓ Detroit Diesel EPA 10 to EPA 13 all DD13, DD15, and DD16 engines ✓ Detroit Diesel GHG17 and newer with Engine Software Version: o App_040B o App_040D o App_0411 o App_2108 o App_2104 o App_2109


and ACM Software Version:

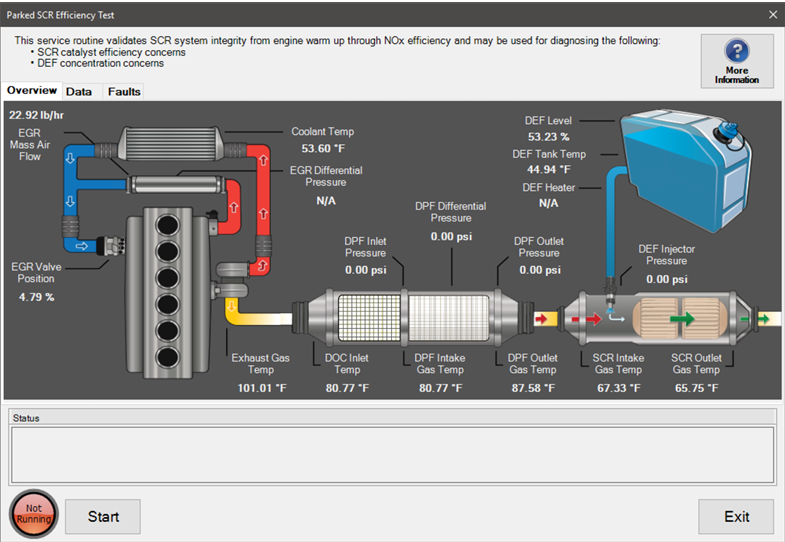
o acm_0x0232 o acm_0x0236 o acm_0x023E o acm_0x0250 o acm_0x024E The Parked SCR Efficiency Test validates the SCR system integrity from engine warm up through NOx efficiency. It may be used for diagnosing SCR catalyst efficiency or DEF concentration concerns.


Related Contents:

JPRO Noregon Commercial Fleet Diagnostics 2024

Noregon JPRO DLA+ 2.0 Adapter


Steps:

1 Select the Parked SCR Efficiency Test and press Enter or select the Start button.

2 If not previously shown, the Aftertreatment Instructions are automatically displayed to provide aid in diagnosing issues with aftertreatment systems. When read, select the Close button on the window.

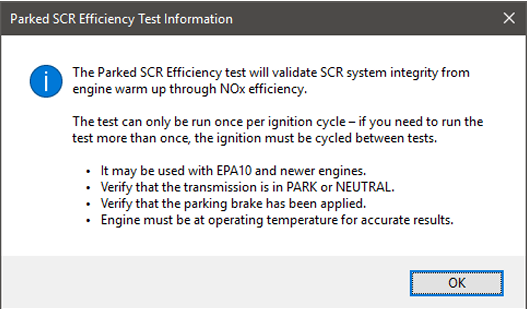
3 The Parked SCR Efficiency Test dialog will be displayed.

How to Use JPRO Diagnostic for Detroit Parked SCR Efficiency Test (1)

4 Select the More Information button to view additional details concerning this test.

How to Use JPRO Diagnostic for Detroit Parked SCR Efficiency Test (2)

5 Select the Data tab to view data related to the aftertreatment system as well as a graph of temperature values.


6 Select the Faults tab to view all active fault conditions for the engine and aftertreatment system.


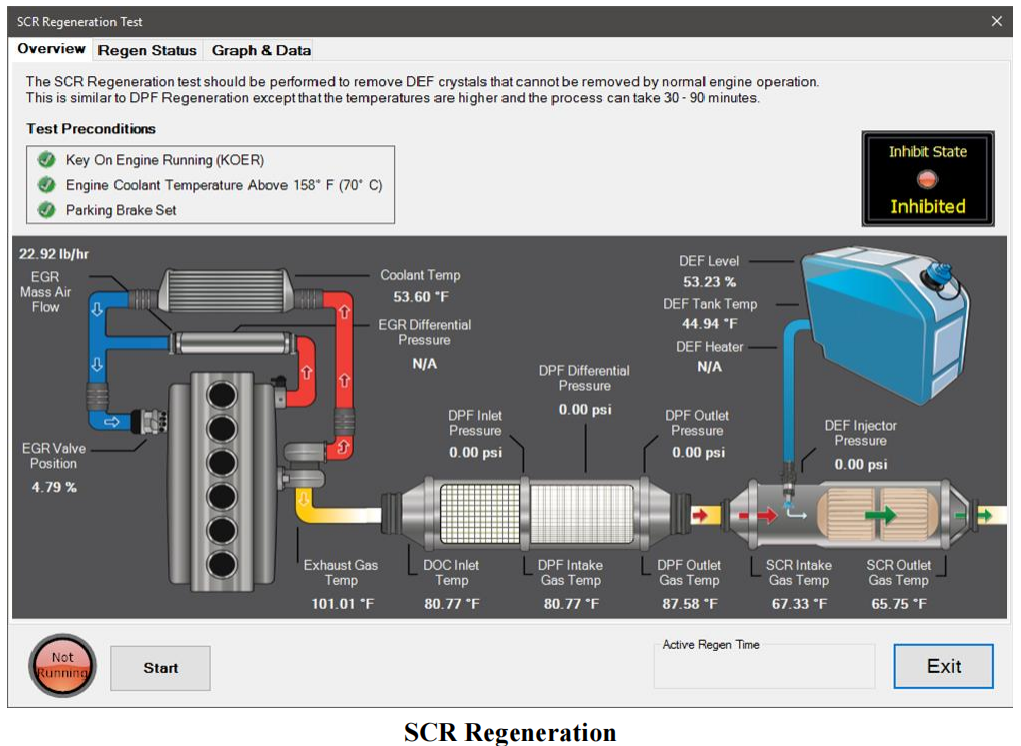
7 To begin the test, press the Start button. The lamp to the left of the Start button will change from “Not Running” to “Running” and highlight as well. The button will change to Stop. NOTE: The transmission must be in park or neutral and the parking brake must be applied prior to starting the test.


NOTE: The engine must be at operating temperature for accurate results.


8 As the test runs, the status area will show what is occurring and the current state. Once the test completes, the status area will display the test results.

9 To end test at any time, press the Stop button. 10. To leave this dialog, select the Exit button.

Posted on

How to Use JPRO to Perform DPF Ash Accumulator Reset for Detroit DD15 Engine

Here is the illustration show you guide on how to use JPRO diagnostic software to do DPF Ash accumulator reset for Detroit DD15 engine.


Related Contents:

JPRO Noregon Commercial Fleet Diagnostics 2024

Noregon JPRO DLA+ 2.0 Adapter


The DPF Ash Accumulator Reset is supported on:
✓ Detroit Diesel EPA 07 Series 60 and DD15 engines
✓ Detroit Diesel GHG17 and newer with Engine Software Version:

o App_040B o App_040D o App_040E o App_0410
o App_0411 o App_2104 o App_2105 o App_2107
o App_2108 o App_2109

and MCM Software Version:

o mcm_0x06DB o mcm_0x06DE o mcm_0x06ED o mcm_0x06EF
o mcm_0x06F2 o mcm_0x06F6

and ACM Software Version:

o acm_0x0232 o acm_0x0236 o acm_0x023E o acm_0x0250
o acm_0x024E


This service routine synchronizes the ash volume between the CPC and ACM and resets the DOC/DPF temperature accumulators.
It should be used when performing one of the following actions:
o Installing a cleaned or remanufactured filter.
o Installing a new filter due to failure.
o Replacing an ACM


1 Select DPF Ash Accumulator Reset and press Enter or press Start Button.
2 The DPF Ash Accumulator Reset dialog will be displayed.

How to Use JPRO to Perform DPF Ash Accumulator Reset for Detroit DD15 Engine (1)

3 If reset is due to filter changes, select “Installing a clean or remanufactured installation or new filter installation due to failure” option and enter the required serial number(s). Depending on the ECU, only 1 serial number may be required. After entering the serial number(s), click the Set Ash Volume button.
4 The user will be asked to verify and confirm the operation. Click Yes to proceed.

How to Use JPRO to Perform DPF Ash Accumulator Reset for Detroit DD15 Engine (2)

5 If reset is due to changing an ACM, select “ACM replacement” option and click the Set Ash Volume button. The user will be asked to verify and confirm the operation. Click Yes to proceed.

How to Use JPRO to Perform DPF Ash Accumulator Reset for Detroit DD15 Engine (3)

6 During the procedure, the progress and status message will be displayed in the progress box. The Close button will be temporary disabled until the procedure completes.
7 After the procedure completes, the Progress box will indicate the results of the requested action. If successful,the Progress box will display a success message. Otherwise, it will display the error message.
8 Press Close button when ready to exit this test and return to the test selection dialog.


More topics about JPRO Diagnostic,please refer to:JPRO Diagnostics Guide

Posted on

Volvo MACK EPA07 Engine Flow Test Injector Activation by JPRO

Volvo MACK EPA07 Engine Flow Test Injector Activation by JPRO

Aftertreatment Injector Activation for Flow Test is supported on:
✓ Mack and Volvo EPA 07 engines.


Related Contents:

JPRO Noregon Commercial Fleet Diagnostics 2024

Noregon JPRO DLA+ 2.0 Adapter


The Aftertreatment Injector Activation for Flow Test activates the injectors to test flow.
1 Select Aftertreatment Injector Activation for Flow Test and press Enter or the Start button.

2 The test dialog will be displayed.

Volvo MACK EPA07 Engine Flow Test Injector Activation by JPRO

3 Select the Start button to begin the test.
4 Activation of the aftertreatment injector should result in a “click” sound. Monitor the displayed data values.
5 Select the Stop button to stop the test.
NOTE: To prevent damage to the engine, the test will automatically stop after 30 seconds.
6 When the test has completed, click the Exit button to return to the test selection dialog.

Posted on

JPRO Wheel Speed Chart Test or Wheel Speed Window Test

JPRO Wheel Speed Chart Test or Wheel Speed Window Test

The Wheel Speed Window test is available for any tractor and trailer braking system that report wheel speed data.
This test can be used to verify and test wheel speed sensors and confirm fault codes before and after a repair or replacement.


Related Contents:

JPRO Noregon Commercial Fleet Diagnostics 2023

Noregon JPRO DLA+ 2.0 Adapter


Procedures:
1Select Wheel Speed Chart Test or the Wheel Speed Window Test and press Enter or press Start Button.
2The test dialog will be displayed.

JPRO Wheel Speed Chart Test or Wheel Speed Window Test

3Lift the suspect axle(s) to allow free spinning wheel(s). While looking at the test screen, spin the wheel(s) to
check for changes in the graph or digital readout to match the wheel being spun.
4Click Diagnostic Info to view additional diagnostic information related to wheel speed readings.
5Press Exit button when ready to exit this test and return to the test selection dialog.

Posted on

How to Use JPRO Diagnostics Memorized Components Reset

The Memorized Components Reset is available on:
✓ All Wabco pneumatic and hydraulic braking systems where the J1587 communication protocol is available Memorized Components Reset causes the brake ECU to relearn which optional components are installed during the next key-cycle. This is necessary to prevent faults when swapping brake ECUs between vehicles.

2023 JPRO V2 Commercial Vehicle Diagnostics Software

Noregon JPRO DLA+ 2.0 Adapter Kit


Procedures:

1 Select the Memorized Components Reset and press Enter or the Start button.

2 The test dialog will be displayed

3 Select the Reset button to initiate the reset operation.
4 Reset operation will be executed.
5 Success or failure will be indicated in a popup message.
6 Select Exit to return to the Test Selection window.

Posted on

Bendix EC-60 & EC-80 Dashboard Brake Lamp Test Guide

Bendix EC-60 & EC-80 Dashboard Brake Lamp Test Guide

This instruction show you guide on how to do dashboard brake lamp test for Bendix EC-60 and EC-80 by JPRO diagnostics.


Preparations:

Noregon JPRO DLA+ 2.0 Adapter

JPRO 2023 Diagnostic Softare

The Dashboard Brake Lamp test is available on:
✓ All Wabco braking systems except the mBSP

✓ Bendix EC-60 and EC-80 braking systems.
This test provides the ability to test the dashboard warning and information lamps related to the braking system.
1. Select Dashboard Lamp Tests and press Enter or press Start Button.
2. The Dashboard Lamp Test dialog will be displayed.

Bendix EC-60 & EC-80 Dashboard Brake Lamp Test Guide

NOTE: If lamp status of a lamp is not available, the lamp test for that corresponding lamp will be disabled.
3. Click the button under the desired lamp. Observe the light change on the truck dashboard. Repeat for all lamps
of interest.
4. When done, press the Exit button to return to the test selection dialog.

Posted on

How to Use JPRO to do Battery Voltage Test on Bendix

How to Use JPRO to do Battery Voltage Test on Bendix

This instruction show you guide on how to use JPRO Diagnostics software to do battery voltage test for Bendix EC-60 and EC-80.


Preparations:

JPRO 2023 Diagnsotic Software

JPRO DLA+ 2.0 Kit


The Battery Voltage Test is available on:
✓ Bendix EC-60 and EC-80 braking systems
This test checks the health of the battery by measuring voltage levels under loaded conditions.

Procedures:

1.Select the Battery Voltage Test and press Enter or the Start button.
2.The test dialog will be displayed.

How to Use JPRO to do Battery Voltage Test on Bendix

3.Select the Start button to begin the test. Multiple braking system valves will be actuated at the same time to increase load on the electrical system. Vertical lines will appear on the graph to indicate the start and end of the test. Observe the graphed battery voltage.
NOTE: The parking brake must be set before running this test. Simultaneous actuation of the braking system valves can cause the vehicle to freely roll during test duration.
4.Select the Stop button at any time to stop the test. The test will automatically stop after a few seconds.
5.When done, press the Exit button to return to the test selection dialog.